10 Tie n Dye Techniques

10 Tie-Dye Techniques: Detailed Explanation with Drawings
Introduction to tie-dye
Tie-dye is a textile-design technique in which fabric is folded, twisted, tied, stitched, or compressed before dye is applied. The tied or compressed portions resist the dye to varying degrees, creating attractive patterns, shapes, lines, and colour combinations. Once the ties are removed, the fabric reveals a unique design.
Tie-dye is widely used in fashion designing to decorate T-shirts, dresses, scarves, dupattas, kurtis, bedsheets, cushion covers, bags, and other textile products. It is popular because it allows designers to experiment with colours and patterns without needing complicated machinery.
The final design depends on several factors: the type of fabric, the folding method, the tightness of the ties, the type of dye, and the time allowed for the dye to react with the fabric.
Natural fibres such as cotton generally work well with fibre-reactive dyes. Synthetic fabrics may require different dyes, depending on their composition. Before starting, always check the dye manufacturer's instructions and use gloves to protect your hands.
Illustrated guide
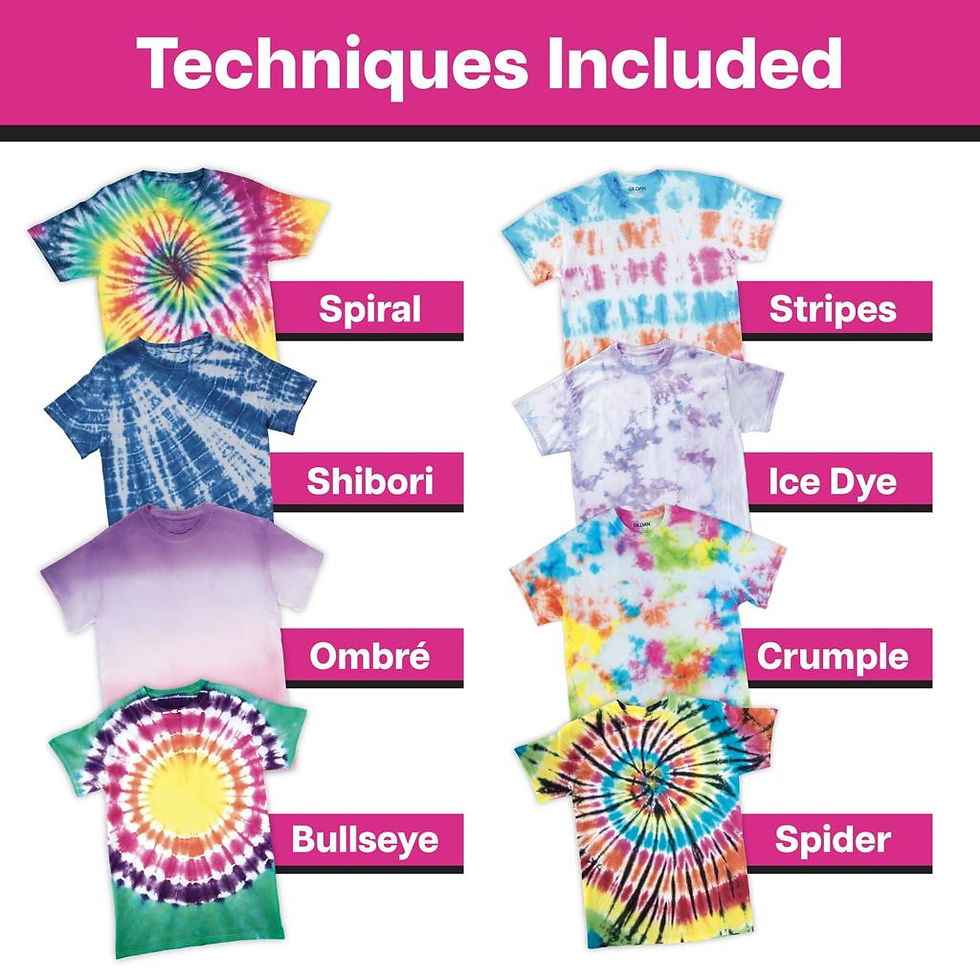
The following ten techniques explain the process, the appearance of the finished fabric, and the uses of each method. The small drawings are schematic guides to help you understand how the fabric is folded and how the pattern develops.
1 Spiral tie n dye

The spiral technique is one of the most popular tie-dye methods. It creates a circular pattern with colours radiating outward from a central point. Depending on the colours selected, the final design may look bright, energetic, psychedelic, or artistic.
Materials required: A white cotton T-shirt, fabric dye, rubber bands, gloves, water, and a plastic work surface.
Procedure:
Spread the washed, damp T-shirt on a flat surface and smooth out the wrinkles.
Pinch the fabric at the point where you want the centre of the spiral.
Rotate the fabric around that point using your fingers. Continue twisting until the entire garment forms a flat, compact disc.
Secure the disc with three to six rubber bands, crossing them over the fabric to divide it into wedge-shaped sections.
Apply different colours to the sections. Use colours that complement each other, such as blue and purple, or red, yellow, and blue.
Turn the bundle over and apply dye to the other side if required.
Allow the dye to react for the time recommended by its manufacturer. Rinse, remove the rubber bands, and wash the garment according to the instructions.

2 Stripe tie n dye technique

Stripe tie-dye produces straight or slightly irregular bands of colour. The direction of the stripes depends on how the fabric is folded and where the ties are placed. This method can create horizontal, vertical, or diagonal stripes.
Procedure:
Spread the damp fabric on a table.
For vertical stripes, fold the garment lengthwise into narrow accordion pleats. For horizontal stripes, fold it widthwise.
Make the pleats as even as possible. Consistent folds produce a more regular pattern.
Place rubber bands around the folded fabric at intervals. The tied areas resist dye and may form pale lines.
Apply dye to the exposed sections, using one colour for a simple design or several colours for a rainbow effect.
Apply dye to both sides, allow the required reaction time, and rinse and wash the fabric.


Applications: Kurtis, dresses, shirts, dupattas, skirts, and home furnishings. Stripe tie-dye is ideal for designers who prefer organised patterns over random designs.
3 Bulleseye tie n dye

The bullseye technique creates concentric rings resembling the target of a dartboard. Unlike the spiral technique, which produces swirling lines, bullseye tie-dye produces circles arranged around a central point.
Procedure:
Lay the damp garment flat.
Pinch the fabric at the point where you want the centre of the circles.
Lift the pinched section upward, allowing the surrounding fabric to hang down in a long tube or cone.
Place rubber bands around the tube at regular intervals. Each band helps define a ring in the final design.
Apply different colours to the sections between the bands. For example, use yellow near the centre, followed by orange, red, and blue.
Ensure the dye reaches the desired sections without excessively mixing neighbouring colours.
Let the dye react, then rinse, untie, and wash the garment.
4 Crumple tie n dye technique
Crumple tie-dye is a simple technique that produces irregular, abstract patterns. It does not require precise folding, making it suitable for beginners. The finished garment usually has a mixture of coloured patches, lighter spaces, and fine irregular lines.
Procedure:
Spread the damp garment on a clean work surface.
Pick up small sections of the fabric and push them together randomly.
Continue scrunching the fabric until it forms a compact, uneven bundle.
Secure it loosely with rubber bands if necessary. Unlike the spiral method, the bundle does not need a fixed shape.
Apply dye to different areas. You may use two or three related colours, such as turquoise, blue, and purple.
Turn the bundle over and apply dye to areas that remain white.
Allow the dye to react as instructed, then rinse and wash the garment.
5 Accordion tie n dye technique
Accordion-fold tie-dye is based on repeatedly folding fabric forward and backward, similar to the folds of a paper fan. It is related to stripe tie-dye, but the fabric can be folded in more complex arrangements to create squares, diamonds, zigzags, and other geometric patterns.
Procedure:
Spread the damp fabric flat and remove major wrinkles.
Fold one edge over a small distance, then fold it back in the opposite direction.
Continue making equal-sized pleats until the whole garment becomes a compact stack.
To create a square or checkerboard effect, first fold the fabric in one direction and then fold the resulting strip in the other direction.
Secure the folded bundle with rubber bands or string.
Apply dye to the exposed edges or selected sections. Different placement of dye produces different geometric effects.
Allow the dye to react before rinsing and unfolding the garment.
6 Ice tie n dye technique
Ice dyeing creates delicate, watercolour-like patterns with subtle variations in colour. Instead of applying liquid dye directly, powdered dye is sprinkled over ice placed on the fabric. As the ice melts, the dye dissolves and travels through the material, creating unpredictable patterns.
Procedure:
Wash and prepare the fabric according to the instructions for the chosen dye. Ice dyeing is commonly performed with suitable fibre-reactive dyes on cotton.
Scrunch or fold the damp fabric and place it on a rack above a tray to collect the melting water.
Cover the fabric with ice cubes.
Wearing suitable protective equipment, sprinkle the recommended dye powder lightly over the ice. Different colours may be used in separate areas.
Leave the ice to melt naturally. As the dye travels through the folds, it creates mottled and marbled effects.
Allow the dye to react for the specified period. Rinse and wash according to the dye instructions.
7 Shibori tie n dye
Shibori is a traditional Japanese resist-dyeing family of techniques. It includes folding, twisting, stitching, binding, and compressing fabric before dyeing. Although it is often associated with indigo blue and white designs, other colours can also be used.
Different Shibori methods produce different patterns. For example, folded and clamped fabric can create geometric shapes, while stitched fabric can form curved lines or intricate motifs.
Procedure:
Select a suitable cotton or other compatible fabric and wash it before dyeing.
Choose a Shibori method. Fold the fabric into a triangle, square, or narrow strip, or stitch a pattern into it.
Bind the folded fabric tightly with string or clamp it between shaped pieces of wood. The compressed areas resist dye.
Prepare the dye bath according to the manufacturer's instructions.
Dip the fabric into the dye, ensuring that the exposed portions receive the desired colour.
Remove the fabric and allow it to develop as directed. Repeat dipping if the dye system requires it.
Untie or unclamp the fabric, rinse it, and wash it according to the dye instructions.
8 Marble tie n dye
Marble tie-dye creates a pattern resembling natural marble stone. The design usually contains flowing veins, irregular colour patches, and cloudy transitions. It can be produced by tightly scrunching fabric and applying contrasting colours, or by using a suitable textile-marbling process.
Procedure using a fabric bundle:
Place the damp fabric on a flat surface.
Twist, scrunch, and fold it irregularly to create many small creases.
Secure the bundle with a few rubber bands if needed.
Apply two or three colours in small areas. Avoid saturating every section with the same colour, because this may reduce the marbled effect.
Turn the bundle over and apply dye where necessary.
Allow the dye to react, then rinse and wash the garment.
For a more controlled marble effect, specialised textile-marbling methods use thickened dye or pigment on a prepared liquid surface. These methods differ from ordinary tie-dye and require suitable materials.
9 Gradient tie n dye technique
Ombre dyeing produces a gradual transition from a light shade to a darker shade. It is not always classified as traditional tie-dye because it does not necessarily require tying, but it is a useful related textile-dyeing technique. Folding or binding can be combined with the gradient to create more complex effects.
Procedure:
Wash and dampen the fabric if required by the dye instructions.
Prepare the dye solution in a suitable container.
Dip one end of the garment into the dye, leaving the opposite end undyed.
Gradually lower more fabric into the dye or move the fabric slowly through the solution. Keep the darkest portion in contact with the dye for longer.
To soften the transition, adjust the depth or duration of immersion carefully rather than creating a sharp boundary.
Follow the dye manufacturer's recommended reaction time, then rinse and wash the fabric.
10 Two tone tye n dye technique
Two-tone tie-dye uses two colours to produce a balanced and visually striking design. It is useful for designers who want a simple colour palette rather than a complicated rainbow pattern. The result may consist of contrasting sections, flowing colour transitions, or areas of white created by resist ties.
Procedure:
Select two colours that complement each other, such as blue and yellow, red and black, or pink and purple.
Wash and dampen the fabric as required.
Choose a folding technique, such as spiral, accordion, bullseye, or crumple.
Secure the fabric with rubber bands or string.
Apply the first colour to the selected sections, then apply the second colour to the remaining sections.
Avoid allowing the colours to mix excessively if you want a clean division. However, slight overlap can create interesting intermediate shades.
Allow the dye to react, then rinse, remove the ties, and wash the garment according to the instructions.
Conclusion
Tie-dye combines textile science with artistic experimentation. Each technique creates a different effect: spiral produces circular movement, stripe produces linear patterns, bullseye forms concentric rings, crumple creates abstract textures, and accordion folding creates geometric designs. Ice dyeing offers watercolour-like effects, Shibori produces traditional resist patterns, marble tie-dye creates flowing textures, ombre produces a gradient, and two-tone dyeing emphasises colour contrast.
For a fashion-design student, the best approach is to practise each method on small cotton fabric samples before dyeing a complete garment. Record the folding method, dye colours, reaction time, and final result in a sample book. This makes it easier to reproduce successful designs and develop original collections.
Important: The drawings are visual references, not exact templates. Actual results vary with fabric construction, dye chemistry, folding pressure, moisture, and processing conditions. Always follow the specific dye instructions for the best colourfastness and finish.


Comments